The birdhouse gourd (also known as calabash or bottle gourd) has been used in many cultures for thousands of years as an agricultural tool and home decor, but it’s only recently become popular in the US as a fun fall project to grow and dry birdhouse gourds.
This guide will walk you through every step of the process, including how to plant your seeds, how to grow and prune your birdhouse gourds once they start growing, and how to harvest, cure, how to make bird house and craft them into birdhouses!
What are Birdhouse Gourds?
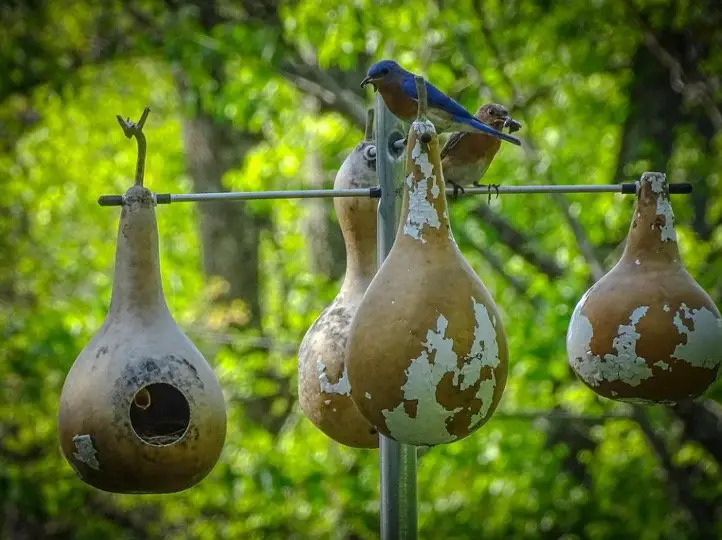
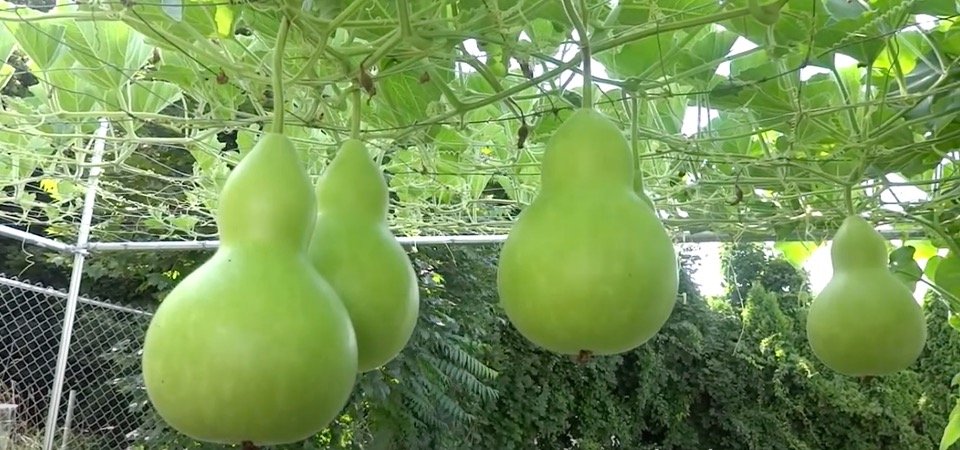
Birdhouse gourds are known for their pumpkin-like shape, with a narrow top (stem) that resembles a bird’s house. The only real difference between a birdhouse gourd and a pumpkin is in its thin, hollow stem. Inside most birdhouses you’ll find small chambers or rooms, each with slits cut into them; these spaces represent where birds might live.
Step-by-Step Guide on How to Grow Birdhouse Gourds
i. Choose the right gourd seeds
Growing birdhouse gourds is easy if you choose gourd seeds from a reliable vendor. Some varieties are more commonly used than others, but there’s no hard-and-fast rule about which is best for your needs. Choose based on personal preference: color, texture, size and shape can all play into what you want out of your gourd seeds. Below are some general guidelines for choosing a variety of birdhouse gourd seeds.
ii. Know your birdhouse gourd shapes
Each birdhouse gourd is different, but there are a few basic shapes that you’ll be able to identify by sight. The sweet potato gourd looks like a small pumpkin, while round-shaped types include small luffas and acorn types. Many birdhouse gourds are cylindrical, which means they can have many uses throughout fall decorating season!
iii. Prepping your soil
It’s important to have rich, fertile soil that provides plenty of moisture for growing gourds. To ensure your plants don’t wilt (and die) during their growth cycle, prepare your garden bed before planting by mixing organic matter (such as manure or grass clippings) with your topsoil. Choose a sunny location in your yard for optimal sun exposure and drainage. When it comes time to transplant, add composted cow manure at a rate of two cups per plant hole.
iv. Planting your seeds
Birdhouse gourds are commonly grown from seed. Since they’re harvested at maturity, it’s important that you plant at least four months before your state’s average last frost date. Mark your calendar with a reminder, since you won’t be harvesting until winter! To plant your seeds, fill a pot about 1/4 of its volume with good-quality potting soil.
v. Watering your plants
Water your plants with a watering can or use a high-pressure hose. Since birdhouses are very small plants, you will want to water them more frequently than your larger garden plants.
vi. Fertilizing your plants
Because birdhouse gourds grow so big, they’ll benefit from some fertilizer. While most gourd species are heavy feeders, it’s important not to overdo it; too much nitrogen can kill your plants. Instead, a good rule of thumb is one tablespoon of a balanced (10-10-10) fertilizer per five feet of vine space every 10 days or so, in early spring and then again at flowering time.
vii. Training your vines to grow up stakes and wires
Choose sturdy sticks about one inch in diameter for your first training system. If you plan on growing two gourd vines on each stake, cut two stakes eight feet long from a sturdy tree or buy four four-foot-long stakes. Push each stake into an outlying corner of your garden where there is plenty of sunlight and wide open space for growth. Drive them firmly into the ground until only about three inches remain above ground level.
viii. When do I harvest my gourds?
Harvest gourds when they are ripe. You will know when a gourd is ripe because it will be somewhat soft. There are several things you can do to check if your gourd is ready: If you have more than one on a vine, look at other, similar-sized gourds on that vine. When most of them have turned yellow, it’s probably time for you to pick! Or smell your gourd!
ix. Drying your gourds completely
Ensure your gourds are completely dry by taking them in and out of a warm environment regularly. This process can take up to a week or longer depending on conditions. The outside of your gourd will feel hard with little give, but it should not crack when bent. If you see splits or dents in the skin, your gourd may still be wet. Once dried properly, birdhouse gourds can last for years.
x. Storing your dried birdhouse gourds
Once your gourds are dry, it is best to store them in a warm, dry place out of direct sunlight. The best place is often inside a dresser drawer or large closet. You can also hang them from large hooks on a wall or nail them directly onto a wall for decoration. Be sure not to store your dried birdhouse gourds near any food you may be storing in your home (this could attract insects). After storing for 6 months, check your birdhouses for signs of mold growth.
How to Make Bird Houses Using Gourds?
Creating a gourd birdhouse is a fun and simple project that is well worth the time and effort. Gourds make excellent homes for birds and they are naturally attracted to them. You can grow your own or simply purchase a dry, hard-shelled gourd. Birdhouse gourds are available almost everywhere that ornamental gourds are sold and some of the cleaning may even have been done for you.
What You'll Need
Equipment / Tools
Drill
1 1/4-inch Drill bit
1 3/8-inch Drill bit
1 1 3/8-inch Drill bit
Small knife
Teaspoon
Paintbrushes
Materials
Gourd
Face mask or respirator
Bleach
Rigid wire (such as a coat hanger)
Wood glue
Paints
Varnish
1 1/4-inch diameter Dowel
Fine-grit sandpaper
Steel wool (not impregnated with soap)
Outdoor tape or small rubber tubing (for wire)
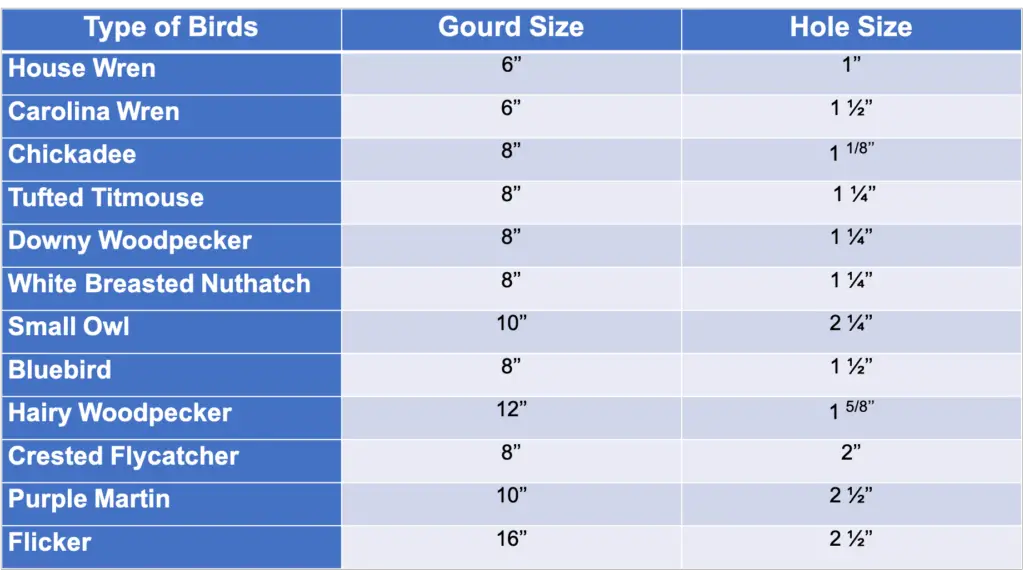
Birdhouse Size Chart
The size of the gourd and entrance hole will vary depending on the type of bird that you wish to attract. Refer to this chart from the American Gourd Society.
Choose dry gourds that have hard, firm shells. The gourd size will govern the kind of bird that will be attracted.
Use a pencil to mark a center point along the outermost part of the curve so the hole faces straight out. Not toward the sky or the ground.
Use a hole saw to drill the entry hole in the gourd. When drilling, it helps to brace the gourd against something so it doesn’t roll. Hold the gourd and the drill firmly, but you don’t need to use heavy pressure.
Hold the gourd level and mark two holes directly across from each other and near the top for the hanging wire.
Use a long-handled tweezers or needle-nosed pliers to pull out large pieces of peelings and clumps of seeds.
Use copper, brass or plastic-coated wire as a hanger for your house.
After the gourd is cleaned out, you can simply apply several coats of varnish or shellac to seal the outer surface and cut edges of all the holes drilled in the gourd.
Hang your gourd birdhouse outdoors in early spring before the birds arrive. Attach it to a post or tree with plenty of space between houses.
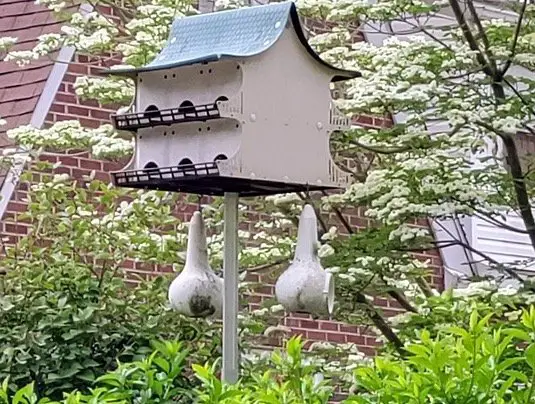
Purple Martin gourd house
Gourds have been used to make purple martin houses for centuries. Native Americans used to hang them to attract martins to their settlements to help control insects. Today, purple martins east of the Rocky Mountains depend on people to supply them with houses and gourds. Time spent creating a purple martin gourd house is a worthwhile investment.
Cured hard-shell gourds are almost as tough as plywood, and they will last up to 30 years if properly coated with a preservative and handled with a little care. These basic gourd birdhouses are popular with the birds and purple martin landlords. The best part is, there’s no limit to the number of homemade purple martin gourd houses you can produce and hang right in your yard. We’ve heard of one purple martin enthusiast who puts up and maintains more than 600 gourd houses every year!
How to paint bird house gourds?
When you have grown your bird house gourds, you will want to decide what color to paint them. There are two things you will need to do when painting your birdhouse gourd: apply 2 coats of primer first, then apply 2 coats of paint. To make your painting job easier, start with applying a coat of primer and allow it dry completely before applying another coat. Primer allows for smoother application of colored paint.
How to clean bird house gourds?
Rinse each bird house gourd gently with clean water. Do not soak them. Use a well-ventilated area for drying your bird house gourds as mold can grow on wet, warm gourds. Make sure there is no moisture left in your dried bird house gourd before putting it out in your garden. Hang the gourd bird house upside down from a hook or nail for best results.